
One way of classifying documents in SharePoint is by associating them with labels. Labels help us retain, delete or not delete/edit documents in Office 365. We can have Office 365 labels for say:
- Documents that need to be retained for a certain amount of time e.g. lessons learnt document for a project
- Documents that cannot be edited or deleted e.g. evidence documents in a law firm
- Documents that need to be permanently deleted from the system after a certain amount of time
- Documents that have sensitive information and need to be marked appropriately e.g. research material
When a label is created, we associate that with a retention policy or a sensitivity policy. Retention policies help us to retain, delete and mark a document as a record. Sensitivity policies help us encrypt, mark content or help us with data loss prevention/data leaks.
More information on creating labels and policies can be found in these articles:
- Using Office 365 to classify and secure your data by Steve Goodman
- Office 365 security compliance by Microsoft
In this blog post we concentrate on how to apply labels to documents in SharePoint using REST API and CSOM. We covert 2 scenarios:
Applying label to a single document using REST API using Postman
Using CSOM, enabling the document setting that will apply a label to all the documents within it.
Using REST API and Postman to apply label
We first start by creating an app registration and then use the credentials of that app registration to get the access token. Once we get the access token, we use that in the HTTP request to get the required data.
SharePoint App Registration
To register an app in SharePoint, navigate to the “New App Registration” page. The URL of that page will be similar to:
https://yourtenantname.sharepoint.com/_layouts/15/appregnew.aspx
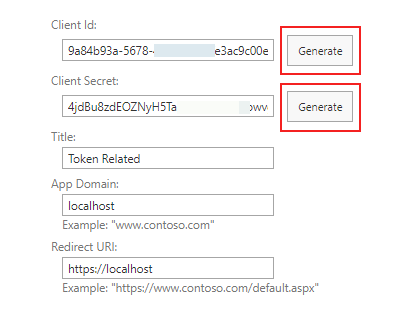
Fill the details in that page as per the following table and click “Create”.
| Field | Value |
| Client Id | Click on generate |
| Client Secret | Click on generate |
| Title | Any value |
| App Domain | localhost |
| Redirect URI | https://localhost |
Copy the generated Client Id and Client Secret into notepad (or any of your favorite editor) as we will need these later.
Now that the app is registered, we need to provide the app with some permissions so that it can access data. In order to do that, navigate to the “appinv.aspx” page (with which you can grant permissions to an app). The URL of that page will be similar to the one below
https://yourtenantname.sharepoint.com/sites/ModernTeamSite/_layouts/15/appinv.aspx
In that page, paste the Client Id in the “App Id” text box and click on “Lookup”. This will load the details of the app we registered previously:
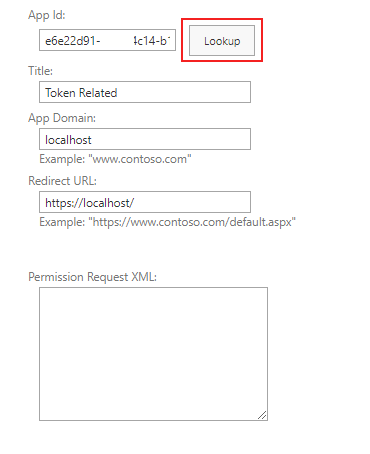
In the “Permission Request XML” paste the following XML. This XML says that the app can have full control over the current web (which is all I need for this case). If you need to give different permissions then please take a look at this article by Microsoft.
< apppermissionrequests allowapponlypolicy="true">
< apppermissionrequest scope="http://sharepoint/content/sitecollection/web" right="FullControl"></ apppermissionrequest></apppermissionrequests >
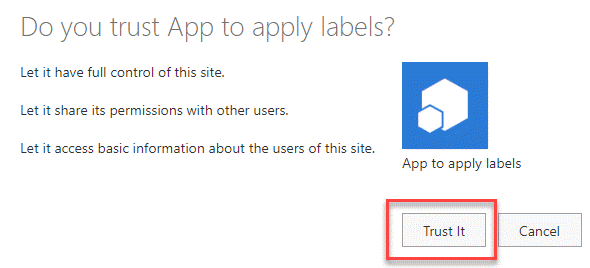
Once that is added click on “Create”. In the next screen click on “Trust It” and this will mean that the app will have the required permissions.
That completes the SharePoint related bits. Now to Postman.
Postman
Please follow the instructions this post to create a Postman environment.
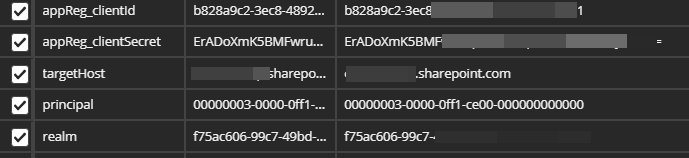
In that environment lets add the following variables:
| Variable | Initial value |
| appReg_clientId | Client Id of the app created earlier |
| appReg_clientSecret | Client secret of the app created earlier |
| targetHost | Yourtenantname.sharepoint.com |
| principal | 00000003-0000-0ff1-ce00-000000000000 |
| realm | Same as the Azure Active directory Id |
For more information on “Principal” please follow this article.
Access Token Request
After the variables are set up, it’s time to send a POST request to get the token. Create a new request in Postman, name it as “Get Access Token” and change it’s request type to “POST”.
The URL will be:
https://accounts.accesscontrol.windows.net/{{realm}}/tokens/OAuth/2
{{realm}} is an environment variable. So, when we send the request, {{realm}} will be replaced with the value we specified earlier.
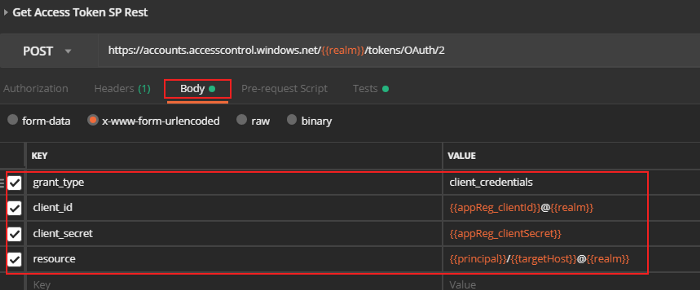
Click on the “Body” tab of the request and add the following Key Value pairs.
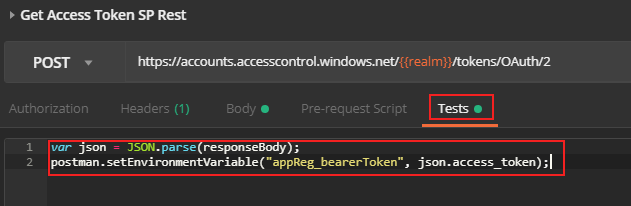
Now click on “Tests” tab in the request and add the following javascript.
var json = JSON.parse(responseBody);
postman.setEnvironmentVariable("appReg_bearerToken", json.access_token);
This code runs after the request is made. It extracts the “access token” from the response, creates an environment variable called “appReg_bearerToken” and assigns its value to the retrieved access token.
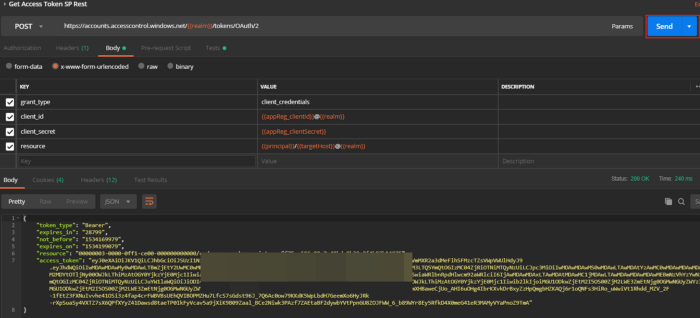
The request is now composed, save it and click on “Send”. This will provide the json response which has access token in it.
This should have created a variable called “appReg_bearerToken” in the environment and assigned the value of it to the retrieved token. You can verify that by looking at the environment variables.
Applying the Office 365 label
We are now ready to apply a label to a document. To do that create a new POST request in Postman with the name “Apply Label”. The URL of that request will be similar to:
https://yourtenantname.sharepoint.com/_api/web/lists/getbytitle('ListTitle')/items(‘item-id’)
/ SetComplianceTag
Where “item-id” is the id of the document.
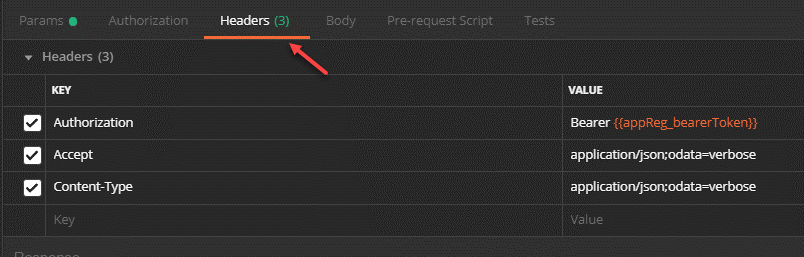
To specify the access token for the request, click on the “Headers” tab and add the following:
| Key | Value |
| Authorization | Bearer {{appReg_bearerToken}} |
| Accept | application/json;odata=verbose |
| Content-Type | application/json;odata=verbose |
Click on the “Body” tab and add the following JSON
{"complianceTag":"Label Name"}
Where “Label Name” is the name of the label you want to associate the document with.
The request is now composed. Save it and click send. This will apply the required label to the document and the associated policy will be applied.
Note: Although we are using Postman here for sending requests, the same can be done using HttpClient in C#, which can then be used in say an Azure function for applying labels. Here is a console application on similar lines.
Using CSOM to update the document library setting
Once a label is added in Office 365, the libraries in SharePoint will have a setting named “Apply label to items in the list or library”. Clicking on that allows the site owner to apply required label to all the items in that list/library.
However, if we want this to happen automatically while provisioning or say want to change this setting for a multiple number of lists/libraries we can use CSOM.
The method that we use is “SetListComplianceTagWithMetaInfo”
static void UpdateListSettings()
     {
            string siteUrl = "https://yourtenant.sharepoint.com/sites/yoursite ";
            string userName = "yourname@yourtenant.onmicrosoft.com";
            string password = "password";

            using (ClientContext ctx = new ClientContext(siteUrl))
            {
                SecureString securePassword = new SecureString();
                foreach (char c in password.ToCharArray()) securePassword.AppendChar(c);

                ctx.Credentials = new SharePointOnlineCredentials(userName, securePassword);

                Microsoft.SharePoint.Client.CompliancePolicy.SPPolicyStoreProxy
.SetListComplianceTagWithMetaInfo(ctx, "/sites/yoursite/ doclibname",
"Label name", false, false, DateTime.Now, userName, false);

                ctx.ExecuteQueryRetry();
            }
        }
The above method will apply the label to all the documents that will be created within it.
Are Office 365 labels actually useful?
Office 365 labels are very helpful in classifying the documents based on retention and sensitivity. We have seen how to apply labels to documents via REST API and CSOM. These methods can be used while provisioning or post provisioning.