
Frequently asked questions for Microsoft Power Apps Developers
Following our Power Apps FAQs for Beginners, our Power Apps Maestro, Tom Moore, compiled this list of Power Apps frequently asked questions for more advanced users. These include:
- When do I collect data or use lookups?
- How do I patch special records?
- How do I brand a Power App?
To bring these FAQs to life and give them context, Tom begins by walking through a Power App built here at Content+Cloud headquarters for taking care of our people during COVID.
A Power Apps Use case scenario: COVID-19 track and trace for employees
Because of the pandemic, we need to track where our people are at any given point and the ability to trace them if necessary. So, we built an app enabling them to check in to our office locations, be it a desk and chair, or even just a spot.
To achieve this, we use one Power App with a few different entities built within SharePoint:
- Lists which look at our offices’ setups.
- All employee submissions – the master list.
Should I use Power Apps collections or SharePoint lists? – Power Apps collections versus pulling directly from SharePoint lists
It’s a common question; should you use collections or SharePoint lists? As you can see below, there are two galleries, both containing the same data.
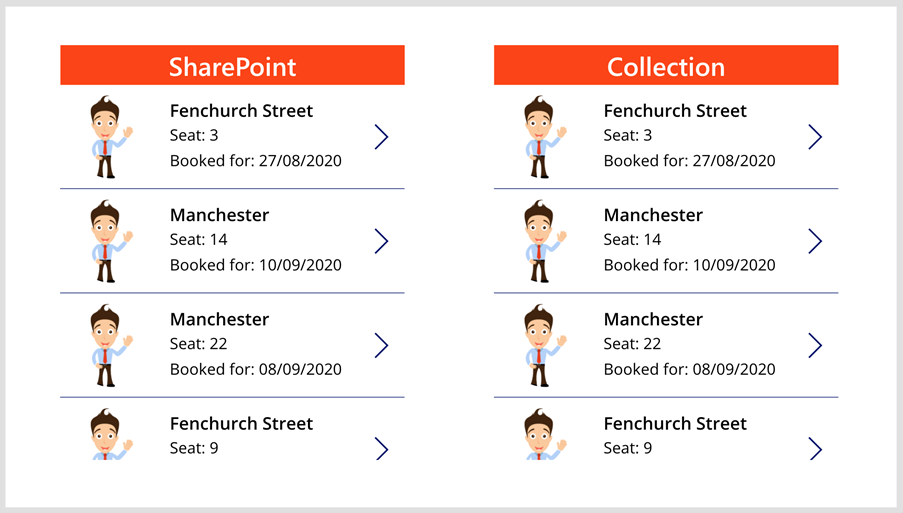
One is pulling the data directly from SharePoint. The other is a collection gathered during the App Start function. Is there a difference? In truth, no. The information is the same, and you can manipulate it in mostly the same way. The only exceptions are the likes of remove statements and patch functions.
But locally collecting and storing the data is faster, and an effective way to bypass the item filter limit of 2,000.
Let’s take our daily Covid-19 office check-ins mentioned at the top of these FAQs. If we tried to show all the entries in one gallery, we’d be limited to 2,000, plus pulling from the SharePoint list would be painfully slow. It would cause lags and impede functionality.
But if we place a ClearCollect ‘On App Start’ and filter the SharePoint list’s calendar date to 14 days of today, suddenly we reduce our item return to a considerably smaller list. And we’ve cut the lag time of continuously connecting to SharePoint.
So, Power Apps collections provide heaps of benefits. One of my favourites is that collections give developers the ability to move the loading time to the ‘App Start’. Better than impeding the user-experience by continually loading as they navigate the app.
How can I build efficiencies into my Power App? – Creating in-app efficiencies: collections, variables/updating context, using OnStart/OnVisible
As you dive deeper into the cavern of Power App development, you should focus on how you can build an app more effectively and efficiently, and ultimately, better. And this means cultivating good habits like these:
- Renaming your items so they’ll still make sense in six months.
- Naming conventions for your variables, so you know the difference between a global and local variable when you reference it.
- Using the OnStart code, rather than waiting for a user to press a button. More on this below.
Why should I use collections for my Power App?
Manipulating local data is always more efficient, especially for apps with large databases.
Collect your lists during the App Start and filter the collections throughout your app to distribute the data. Refresh the main list and re-collect the primary collection only when necessary, say after a submit or a patch.
Why would I use a context variable over a global variable? – Global variables versus context variables
This is a question we often hear. The answer comes down to app need. Context variables can be considered local. They don’t pass data/parameters across screens, meaning you can’t alter or accidentally manipulate things outside of that screen.
And context variables are essential when you have multiple screens with similar functions, like popups or tabbed navigation.
Let’s say you have a popup control on a button on the home screen. In our scenario, it’s a COVID disclaimer. You also have a popup control on the third screen; in our case, it’s to confirm an office booking.
If you used a global variable:
- OnSelect of the button on the home screen would be ‘Set(varPopup, true)’ and has all of our popup items visible based on ‘varPopup = true’.
- Clicking that button on the home screen now makes our popup on the third screen visible because the global variable carries across screens.
If you used a context variable:
- OnSelect of the button on the home screen ‘UpdateContext({conPopup:true})’ and has all of our popup items visible based on ‘conPopup’.
- Clicking that button on the home screen only affects the home screen popup.
It’s good practice to clear your context variables when moving between screens, using the OnVisible of the screen or the same button that provides you with the Navigate to clear them.
Ultimately, the context variables mitigate your damage limitations. Use global variables only where passing data across the app is strictly necessary.
How do I manage people and other fields in my Power App and SharePoint? – Advice for using complex fields and SharePoint
Submitting to SharePoint is easy, most of the time. But even SharePoint adds some complexities – they’re usually around submitting data to the slightly more ‘special’ field types.
Here, I focus on people fields, together with a quick overview of patching Lookups. One of my favourites with people fields is to utilise my App Start to collect my data. This is the variable I set:
Set(varSubmitUser, {

  '@odata.type':"#Microsoft.Azure.Connectors.SharePoint.SPListExpandedUser",

  Claims:"i:0#.f|membership|" & Lower(User().Email),

  Department:"", DisplayName:User().Email,

  Email:User().Email,

  JobTitle:".",

  Picture:"."

});
Breaking this example down, I’m essentially calling the data type and completing the respective attributes for that record. You don’t necessarily need all these attributes in your variable.
As you can see, some of them I’m not even using, but I call them just in case because I’m always patching into SharePoint. At any rate, the Office 365 profile immediately takes over so “Claims” (username/email) would probably be enough.
Now the data set is ready to go. Bringing in a form, I want to default the people field to the current user:
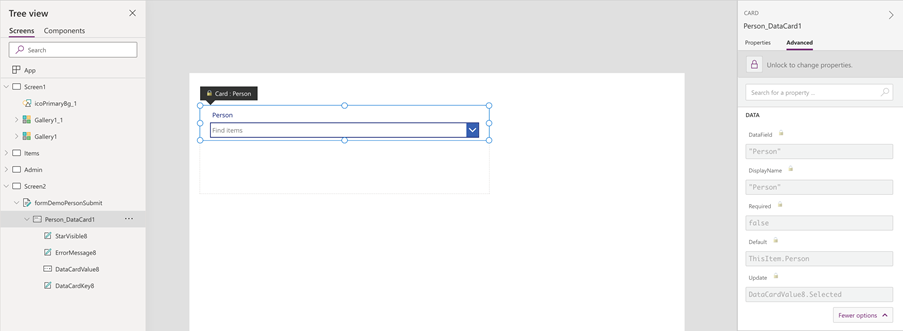
As you can see, the card is currently locked. So, the first step is to unlock it (top right).
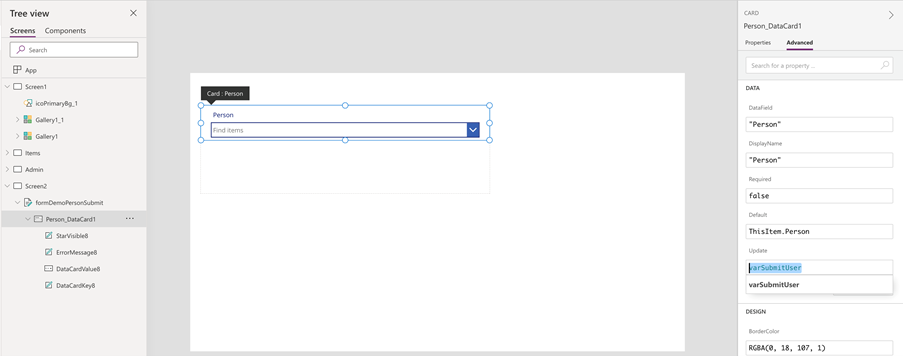
Once unlocked and ensuring we’re still on the DataCard (check in the tree view on the left), we utilise the Update function and place in our variable.
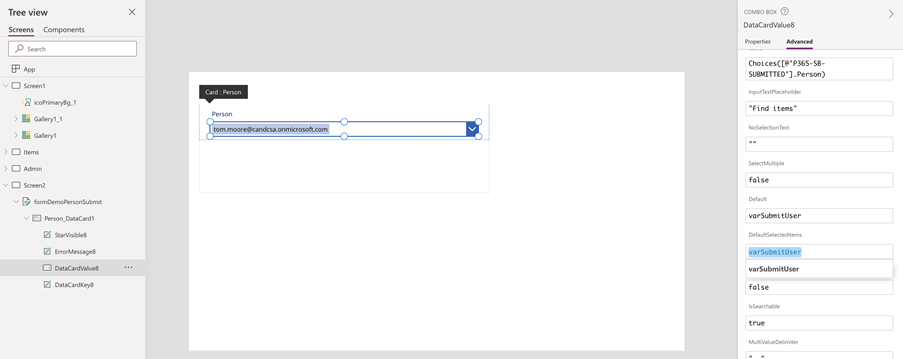
Now, making sure we select the DataCardValue (the dropdown – check in the tree view again), we want to replace the Default and the DefaultSelectedItems with our variable. Doing this gives us exactly what we need, and the form will submit without error.
What is the patch function in Power Apps?
A patch function is super useful. You can target a record to update values or create a new record by swapping the ‘Lookup’ to ‘Defaults’. Taking the above example, patching a people field is no different:
Patch(

    'SPO-LIST-SUBMITTED’,

    LookUp(

        'SPO-LIST-SUBMITTED',

        ID = galSelectedPerson.Selected.ID

    ),

    {

        Person: {

            '@odata.type': "#Microsoft.Azure.Connectors.SharePoint.SPListExpandedUser",

            Claims: "i:0#.f|membership|" & Lower(User().Email),

            Department: "",

            DisplayName: User().Email,

            Email: User().Email,

            JobTitle: ".",

            Picture: "."

        }

    }

)
We call the column (in this case, person), and we wrap the same code inside some curly brackets to make it happy. If we don’t need the current user to be the one we’re patching, we’d insert another Office 365 profile into a variable (like a varGuestUser, for example) and replace the User().Email with a varGuestUser.mail instead.
How does Power App branding work? – How to brand your Power App
I’ve been bitten many times by the need to change an organisation’s branding. Branding in Power Apps is not a default and can be a pain if you do items individually. Imagine you burned the midnight oil and built an app with five screens and hundreds of labels, buttons, and icons.
You proudly deliver it to your manager, who says: “Can we have it in company colours?”
That’s a mammoth task to individually re-colour or re-font all those items! Here’s my special tip. You need:
Power App ‘OnStart’ code:
//Set Colours

Set(colourPrimary, RGBA(250, 69, 13, 1));

Set(colourSecondary, RGBA(60, 60, 60, 1));

Set(colourTertiary, RGBA(76, 126, 158, 1));
And two screens. Your first – the “Admin” screen:
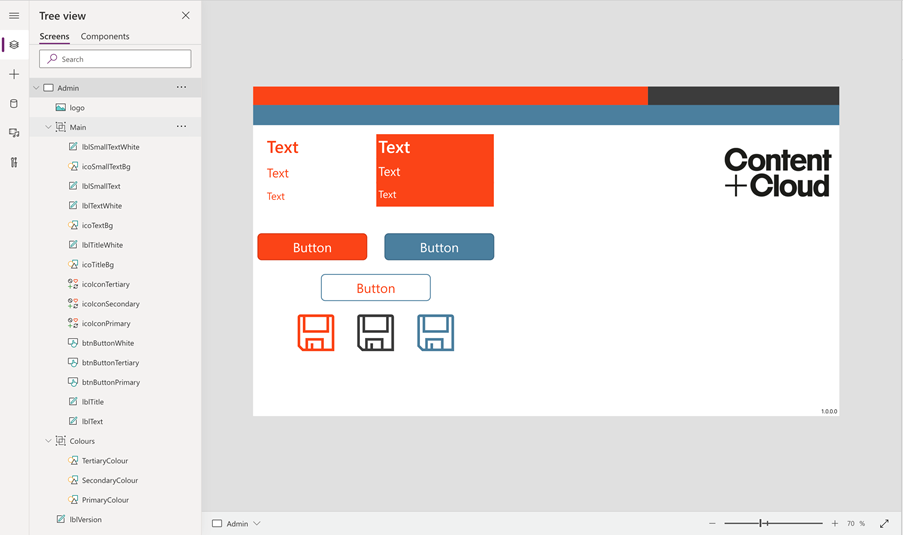
Breaking this down, what you can see is:
Six labels:
- One for titles
- One for normal text
- One for any smaller text requirements
All of which I then duplicate and switch to white text, for use on coloured backgrounds as necessary.
Three buttons:
- One brand with the primary colours (build the colours however you want; I have a primary colour on fill and hover etc., so it looks nice but experiment as you need).
- One brand for the tertiary colour so that I can use it on my primary colour backgrounds.
- One white (or transparent) brand because that goes with everything.
Three icons:
- One primary colour icon
- One secondary colour icon
- One tertiary colour icon
And I also have three rectangles with the colour sets, so that I know what I’m working with.
To brand all these items, I use the variables that I’ve set in my App OnStart code. For example, the colour of my icon is:
![]()
And then I have two more icons where I set the colour to colourSecondary and colourTertiary.
If I need to re-brand this app, I can quickly go to the OnStart code, change the RGBAs and all my items change colour. Fantastic! But let’s take it a step further.
Your second screen – Items:
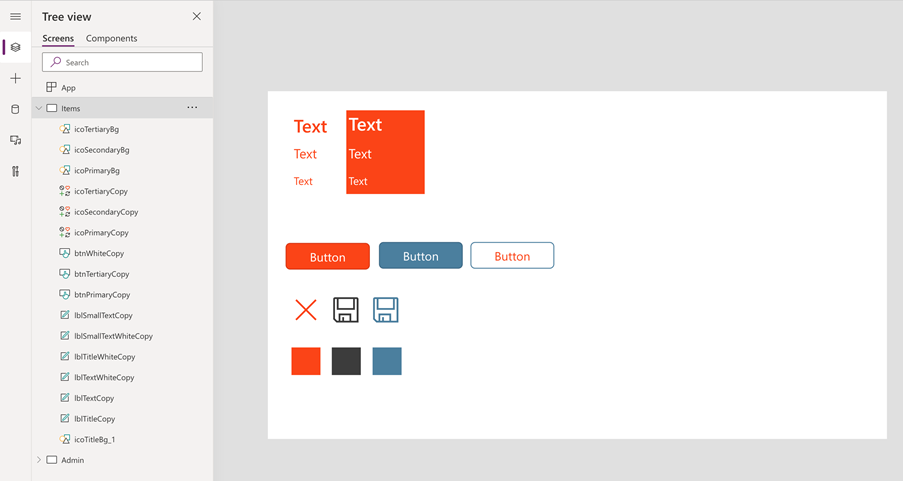
The Items screen looks the same, except every single item I have now points to its counterpart on the admin screen. For example, my lblTitleCopy functions are all set to my lblTitle functions from the admin screen:
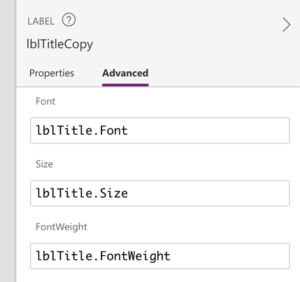
So, to explain this further, stick with me. I have an Admin screen with all my main items.
I have an Items screen, on which I point all the items’ functions (font size, font weight, font, colour, fill – everything that I know changes) to the Admin screen items’ functions. So, lblTitleCopy is set to “FontWeight = lblTitle.FontWeight” etc.
Whenever I need a label, icon, button, rectangle, whatever, I’ll go to my Items screen, copy the one I want and paste it around my app.
Why? Let’s say I need to change the font because my manager doesn’t like Segoe UI. I’ll go to my Admin screen and change the font of my title text. Now, every single item around my app will automatically change because they’re all pointing to the one that I changed!
I then add whatever else I regularly use into my OnStart code or data sources, things like:
//Gather User Details

Set(varCurrentUser, Office365Users.MyProfileV2());
I then save the app, call it “Template App”, and now whenever I need to build a new Power App, I’ll edit this Template app > Save As new name. And I have everything I need ready to go!
Take your Power Apps and tech knowledge to the next level
For more Power Apps wisdom and guidance on all things tech-related, you can dine out on Digital Revolution Live – on-demand. Get your free, all-access pass to over 20 bite-sized sessions, spanning cyber, IT and business strategy, remote working, the hybrid workplace and more.
And for a limited time, we’re offering free ‘Art of the Possible’ workshops to help you tackle your most pressing technical and business problems. Click here to learn more or on the button below. Thanks for reading!